Homelab
How an Old Laptop, a Forgotten NAS, and a 5-Meter USB Cable Became My Personal Cloud
By Dwi Widyanto
There is a special satisfaction in giving old technology a second chance.
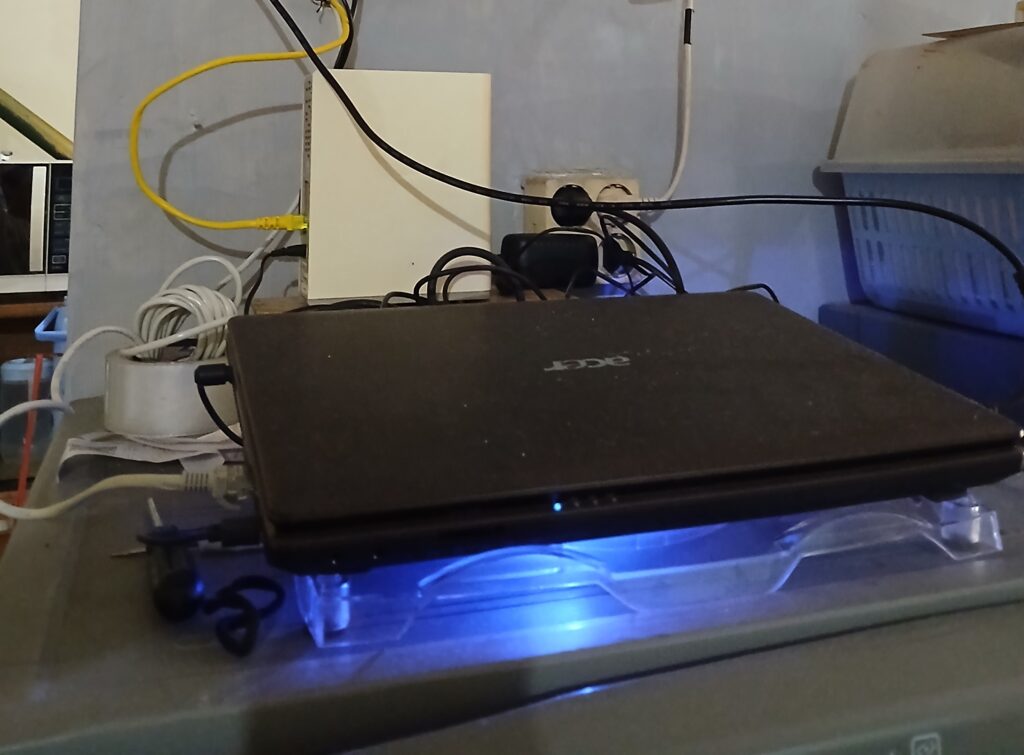
Most people would look at an aging Acer Aspire 4738Z laptop and a first-generation WD My Cloud and see obsolete hardware destined for storage boxes, recycling centers, or electronic waste.
I saw something different.
I saw a personal cloud.
A backup server.
A download station.
A wireless print server.
A remote-access gateway.
A home lab.
And most importantly, a challenge.
What started as a simple idea—“Can I still make use of this old laptop?”—slowly evolved into a complete home infrastructure platform that now runs quietly in the corner of my house, serving files, backing up data, downloading content automatically, and even printing documents wirelessly from phones and laptops.
All without purchasing a new NAS.
All without monthly cloud subscriptions.
And all while proving that useful technology doesn’t always have to be new.
The Hardware Nobody Wanted
The foundation of this project is surprisingly humble.
Main Server
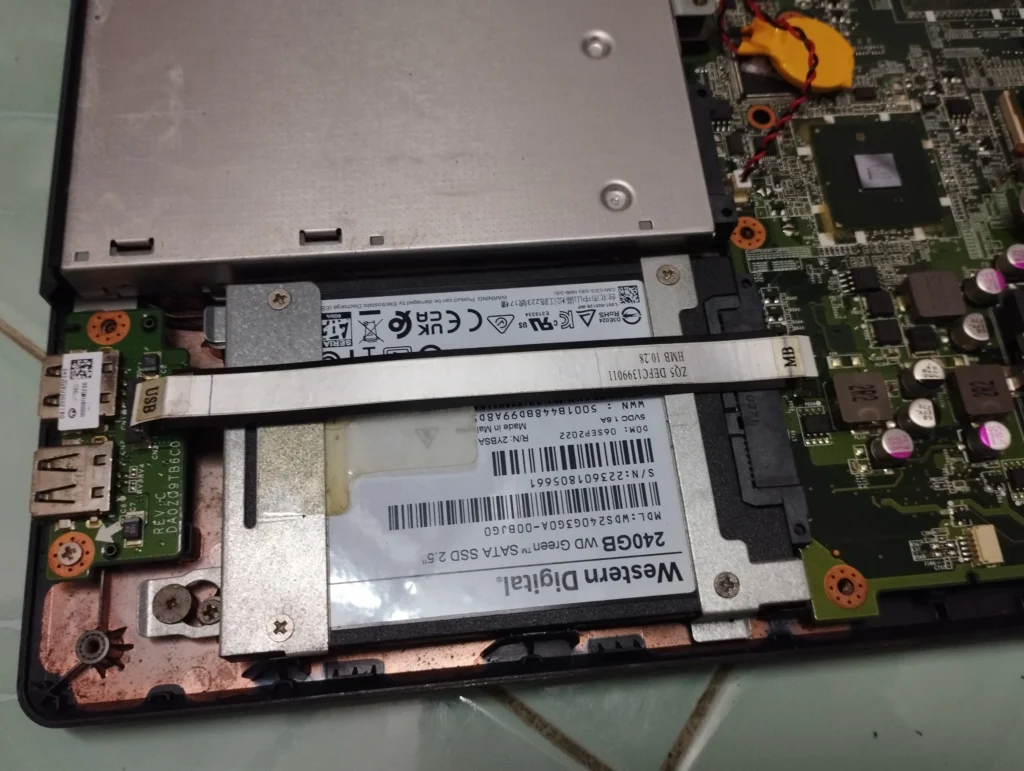
- Acer Aspire 4738Z
- Intel Pentium P6200 Processor
- 320 GB SATA drive for operating system
- Additional 1 TB SATA drive installed in the former DVD drive bay
- Gigabit-capable local networking via Ethernet
- Debian Linux + OpenMediaVault
Backup Storage
- First-generation WD My Cloud
- Repurposed exclusively as a backup target
- Never exposed directly to the internet
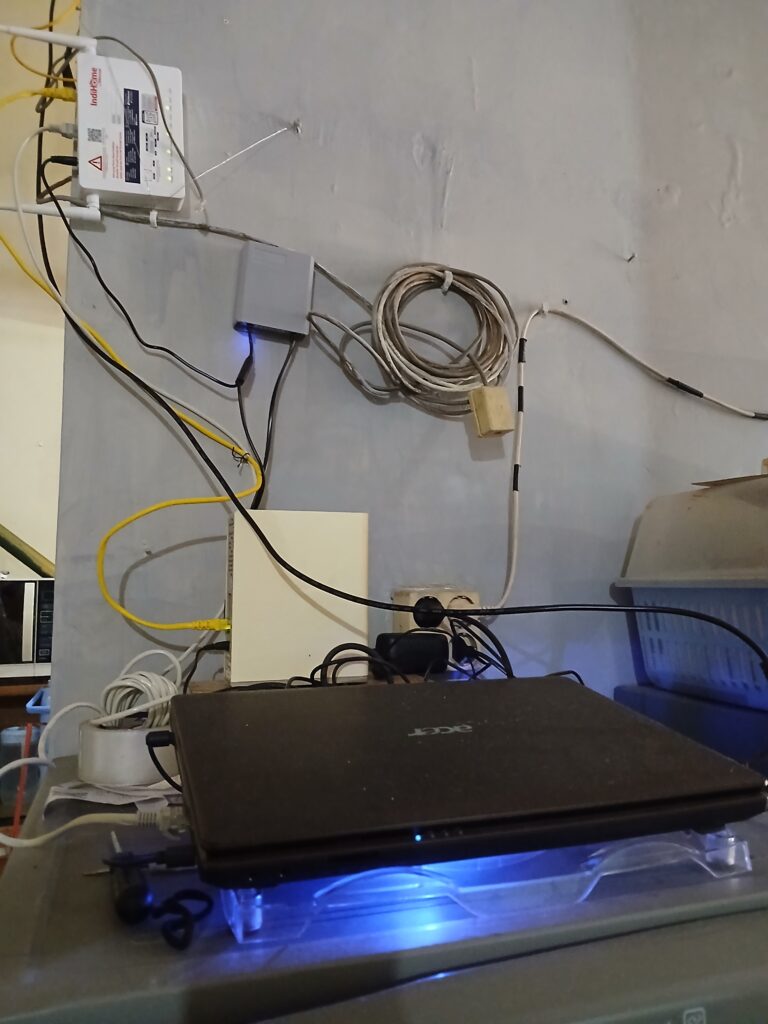
Network Infrastructure
- Fiber internet connection
- ZTE F672Y router
- Static IP assignments for infrastructure devices
- Tailscale for secure remote access
On paper, it is nothing remarkable.
In practice, it has become one of the most useful systems in my home.
Phase 1: Turning a Laptop into a NAS
The first step was transforming the Acer Aspire into a dedicated server.
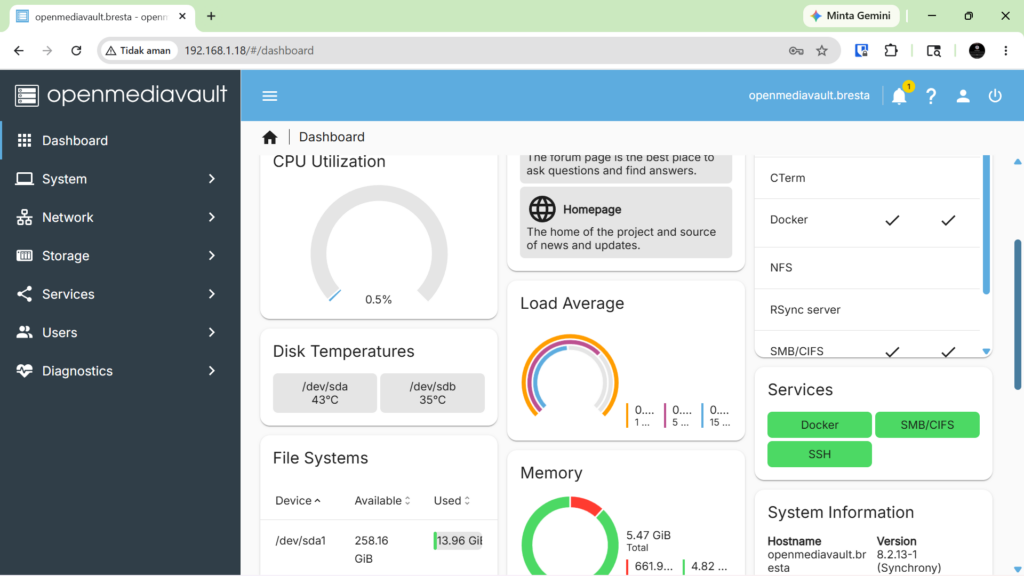
Instead of installing a desktop operating system, I chose OpenMediaVault (OMV), a Linux-based platform designed specifically for network-attached storage.
Why OMV?
Because it provides:
- SMB file sharing
- User management
- Scheduled tasks
- SMART disk monitoring
- Docker support
- Web-based administration
- Backup capabilities
Within a few hours, the old laptop was no longer a laptop.
It had become a NAS.
The screen rarely needs to be opened.
The keyboard is rarely touched.
It now behaves more like an appliance than a computer.
Phase 2: Breathing New Life into a WD My Cloud
The original WD My Cloud was once marketed as a personal cloud device.
Unfortunately, many early-generation units received limited long-term support and became increasingly difficult to justify exposing to the public internet.
Many owners retired them.
I chose a different approach.
Instead of replacing the device, I reassigned its role.
The WD My Cloud now serves exclusively as a backup appliance inside my local network.
Its responsibilities are simple:
- Receive backup copies from OMV
- Store archived files
- Remain isolated from direct internet exposure
This approach dramatically reduces security concerns while continuing to extract value from perfectly functional hardware.
Phase 3: Winning the SMB Battle
This phase consumed far more time than expected.
Connecting modern Linux systems to older NAS devices sounds straightforward.
It wasn’t.
I encountered:
- Authentication failures
- CIFS mounting issues
- SMB protocol mismatches
- Legacy security settings
- Permission problems
- Countless error messages
One lesson became very clear:
Modern Linux systems and legacy NAS devices often speak slightly different dialects of the same protocol.
After several rounds of testing and troubleshooting, the correct combination of SMB version and authentication settings finally allowed the systems to communicate reliably.
The lesson?
Most infrastructure projects fail not because of complex technology, but because of small compatibility details.
Phase 4: Building a Private Cloud Without Opening Ports
One of my goals was remote access.
I wanted access to my files from anywhere without exposing my home network to unnecessary risks.
The traditional approach usually involves:
- Port forwarding
- Dynamic DNS
- Firewall configuration
- Public service exposure
Instead, I deployed Tailscale.
The architecture became:
Internet ↓ Tailscale ↓ OpenMediaVault ↓ WD My Cloud
The result is remarkably elegant.
No exposed ports.
No complicated firewall rules.
No public-facing services.
Wherever I am, my NAS appears as though it is sitting beside me on the local network.
Phase 5: Creating an Unattended Download Station
The next objective was automation.
I wanted downloads to happen without manual intervention.
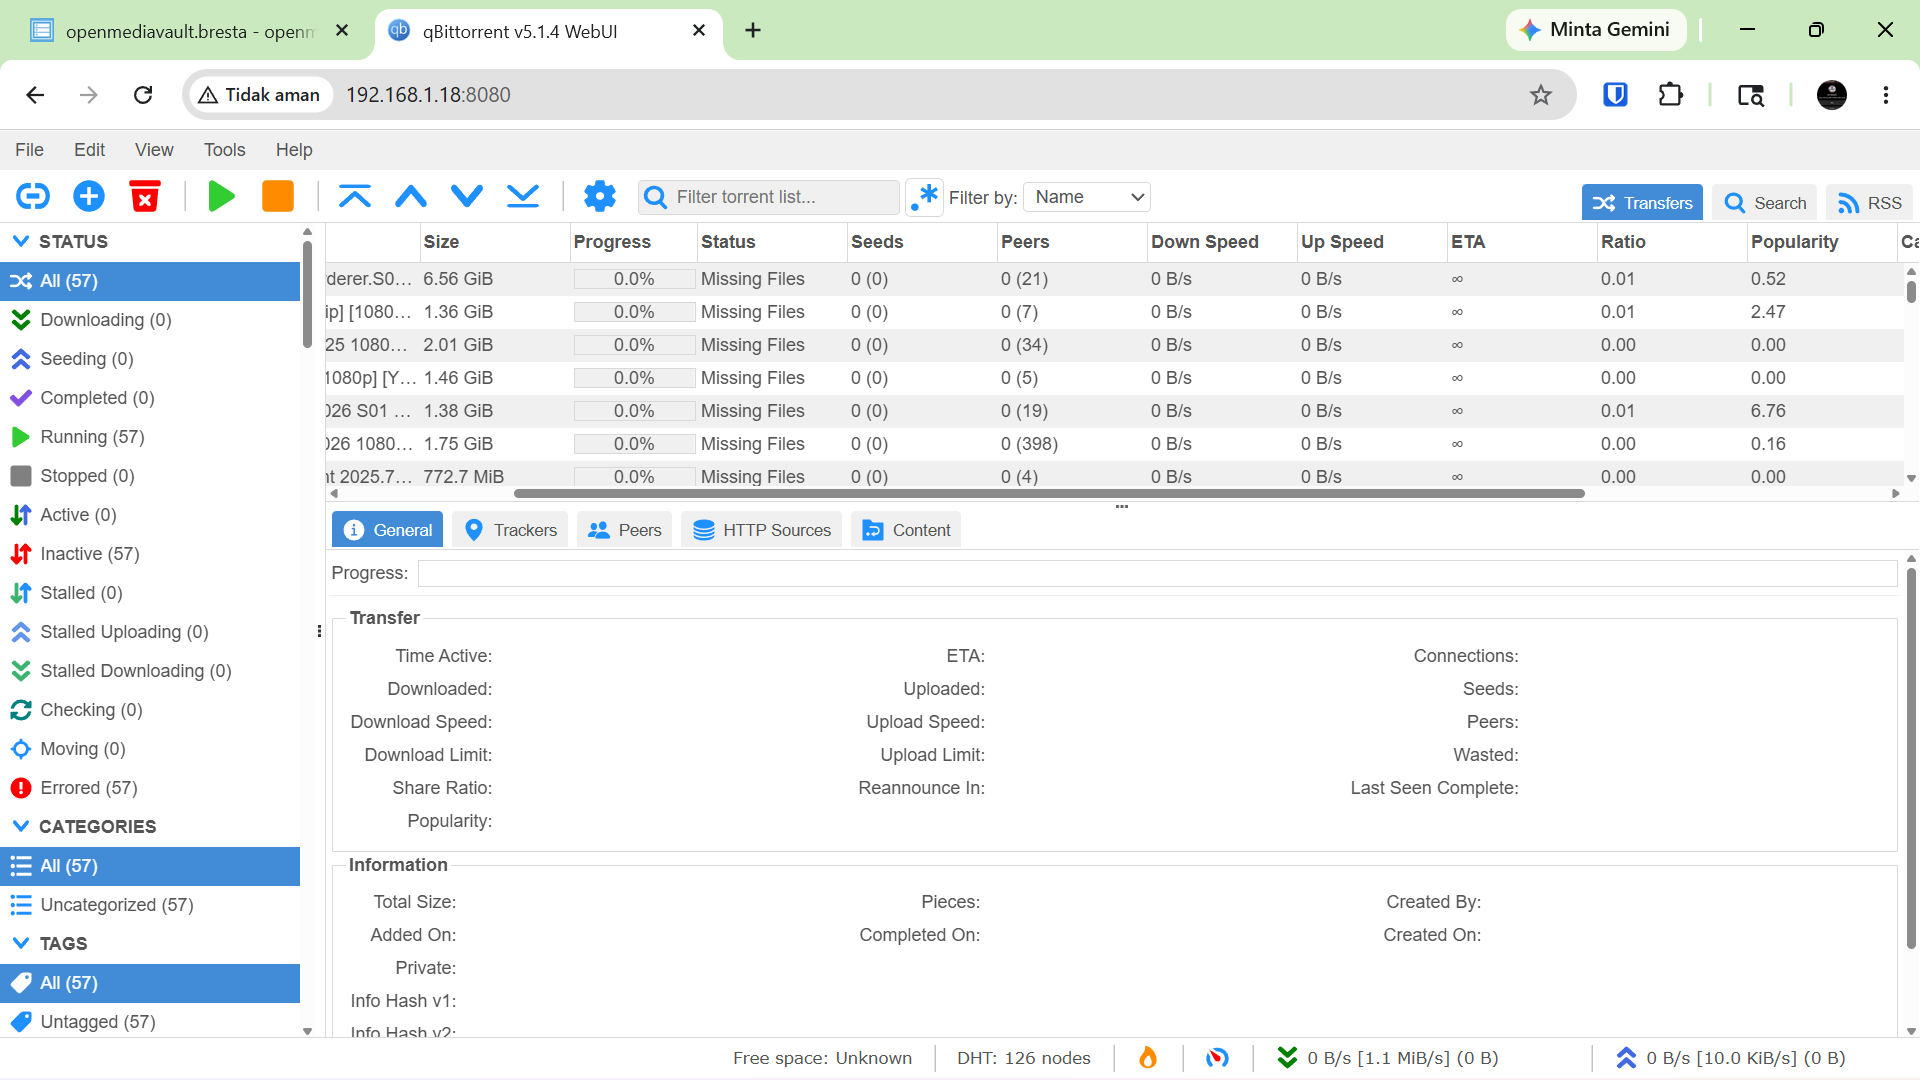
Using Docker and OMV Compose, I deployed qBittorrent.
A watch folder was created so that dropping a torrent file into a designated directory automatically starts the download process.
The workflow became:
Torrent File ↓ Watch Folder ↓ Automatic Download ↓ Automatic Organization ↓ Automatic Backup
No browser tabs.
No manual clicks.
No repetitive tasks.
Exactly the way automation should work.
Phase 6: Organizing Downloads Properly
One lesson learned quickly was the importance of separating completed and incomplete downloads.
The final structure became:
/watch
/downloads/incomplete
/downloads/complete
This seemingly simple decision prevents:
- Backing up incomplete files
- Media library confusion
- Storage clutter
- Synchronization issues
Sometimes the most valuable improvements are organizational rather than technical.
Phase 7: Automatic Migration to Shared Storage
Once downloads are completed, they are automatically transferred to the WD My Cloud Public share.
The process is now entirely hands-off:
Torrent ↓ OMV Downloads ↓ Completed Folder ↓ WD My Cloud Public Share
Family members can access files directly from the WD My Cloud while the OMV server continues handling downloads and automation in the background.
Each device now performs the tasks it is best suited for.
Phase 8: Turning a USB Printer into a Wireless Print Server
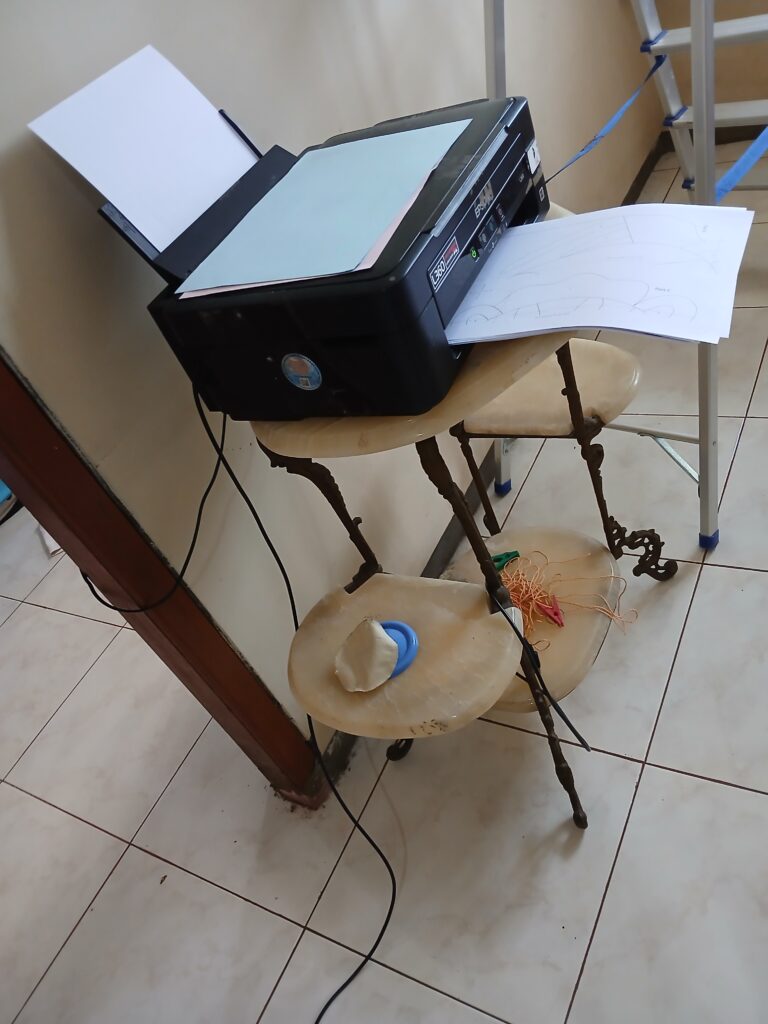
This became one of my favorite parts of the project.
The Epson L360 printer is located on the second floor where it is actually used.
The NAS server lives downstairs near the network equipment.
The printer itself has:
- No Wi-Fi
- No Ethernet
- No cloud printing
- No wireless capabilities whatsoever
Only USB.
Instead of replacing a perfectly functional printer, I decided to upgrade it with software.
A 5-meter USB cable connects the Epson L360 upstairs to the Acer NAS downstairs.
Using:
- CUPS (Common Unix Printing System)
- Avahi
- Epson ESC/P-R drivers
the USB printer became a network printer visible throughout the entire house.
The workflow now looks like this:
Phone ↓ Tablet ↓ Laptop ↓ Wi-Fi Network ↓ OpenMediaVault Print Server ↓ Epson L360
The printer itself never changed.
The intelligence moved into the server.
Today anyone in the house can print wirelessly from:
- Android phones
- Windows laptops
- Linux computers
- Future Apple devices through AirPrint compatibility
A printer that predates widespread home Wi-Fi printing suddenly behaves like a modern network printer.
That is the power of software.
Phase 9: Making Old Hardware Efficient
Running an old laptop 24 hours a day raises obvious questions.
What about power consumption?
What about heat?
What about reliability?
Several optimizations were implemented.
CPU Frequency Optimization
The Pentium P6200 processor originally operates up to 2.13 GHz.
For file serving and print serving, that is unnecessary.
The processor was configured to run at approximately 1.2 GHz, significantly reducing power consumption while maintaining excellent responsiveness.
Headless Operation
The laptop is configured to remain operational even when the lid is closed.
This transforms it from a personal computer into a dedicated appliance.
Built-In Battery Backup
Unlike desktop servers, laptops include an integrated battery.
This effectively acts as a miniature UPS during short power interruptions.
While not a replacement for a dedicated UPS, it provides an additional layer of resilience that many budget NAS solutions lack.
The Current Architecture

Lessons Learned
This project reinforced several beliefs I have held for years.
Reuse Before Replace
Old hardware often remains perfectly capable.
Its limitations are frequently software-related rather than hardware-related.
Keep Critical Services Local
Not everything needs a cloud subscription.
Many services can be hosted privately with greater control and lower cost.
Security Through Simplicity
Reducing internet exposure often improves security more than adding complexity.
Automate Repetitive Tasks
Computers should perform repetitive work.
Humans should not.
Learning Happens Through Building
No tutorial teaches as much as solving real-world problems yourself.
Every authentication error, permission issue, and failed mount became part of the learning process.
What’s Next?
A home lab is never truly finished.
Future possibilities include:
- Jellyfin media server
- Automated media organization
- Research data repository
- Monitoring dashboards
- Engineering project archives
- AI-assisted file management
- Off-site backups
But for now, I am content knowing that an old laptop, a retired NAS, and a printer connected by a ridiculously long USB cable are quietly working together to provide services that many people pay monthly subscriptions to obtain.
Not bad for hardware that was once considered obsolete.
Sometimes technology does not need replacing.
Sometimes it simply needs a second chance.